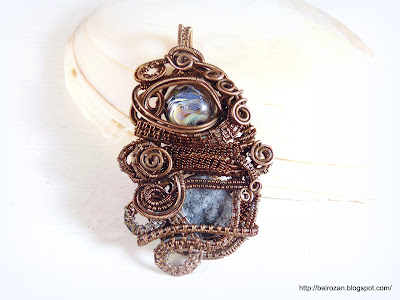
Днес ще ви покажа снимки от работния процес по създаване на колиета от серията "Третото око" с авторски "галактически" мъниста на PetrovnaLampwork. Ако владеете основни техники и начини на оплитане, едва ли ще е проблем да се възползвате от идеята ми :) Снимките са от изработката на две различни колиета, но принципът е един и същ.
Today, I'm going to show you WIP pics of creating Third Eye pendants with PetrovnaLampwork Galaxy beads. If you have basic wire wrapping and weaving skills, it will hardly be a problem to use my idea :) The pictures are from the making of two different pendants but the principle is the same.
Направих овална рамка от тел и я посплесках с чук, хем да се втвърди, хем да е по-лесно увиването на краищата на телчетата около нея. Направих държача. Оплетох две двойки телчета, първо 2х2, после четирите заедно близо до рамката, като оставих отвор за мънистото. Поставих ги под рамката и отново разделих телчетата от горната страна на 2х2, поставих мънистото в отвора и започнах да увивам около него, за да го застопоря. Следва импровизация :) Да уточня, че измислих този начин специално за кръгли мъниста без дупка (или частично продупчени).
I made an oval wire frame, hammer-hardened it and made the bail. I wove two pairs of wire first 2 by 2 and then all four together closer to the frame, leaving an opening for the bead. Placed them under the frame, separated the four wires on each end 2 by 2 again, put the bead inside and started wrapping around it to fix it in place. Now, improvise! I'd like to emphasize that this method is for non-drilled (or half-drilled) marbles.
По-долу се виждат трите оплетки 2х2 около мънистото - тази в основата и по две отстрани - освен че можете да увиете страничните около рамката и да направите още декоративни "врътки" по рамката, желателно е да увиете и около тях самите в двата края за да пристегнете "гнездото" на мънистото. Използвах тел 0.75 мм за основа и 0.3 мм за увиване.
These pictures show the three 2 by 2 weaves around the bead - the basic one and two more on the sides. Besides creating twists and swirls and wrapping around the frame, you should also wrap around both ends of the bead caging to tighten it. I used 21 Ga basic wire and 28 Ga weaving wire.
После добавих още оплетки, за да запълня празното пространство. Също и кристалчета за малко звезден блясък :)
I then added more weaves to fill in the negative space. Also, some tiny crystals to imitate twinkling stars.
Вярвам, че виждате и другите възможности - увиване с тел с нанизани ситни или по-големи мъниста или "врътки" с тел без оплитане. Или да добавите още едно по-голямо мънисто като в този по-стар модел на снимката по-долу.
I believe you see all the possibilities - wrapping with seed beads or natural beads on wire or swirls with non-woven wires. Or adding one more bigger bead as in this previous design below.
По-долу се виждат трите оплетки 2х2 около мънистото - тази в основата и по две отстрани - освен че можете да увиете страничните около рамката и да направите още декоративни "врътки" по рамката, желателно е да увиете и около тях самите в двата края за да пристегнете "гнездото" на мънистото. Използвах тел 0.75 мм за основа и 0.3 мм за увиване.
These pictures show the three 2 by 2 weaves around the bead - the basic one and two more on the sides. Besides creating twists and swirls and wrapping around the frame, you should also wrap around both ends of the bead caging to tighten it. I used 21 Ga basic wire and 28 Ga weaving wire.
После добавих още оплетки, за да запълня празното пространство. Също и кристалчета за малко звезден блясък :)
I then added more weaves to fill in the negative space. Also, some tiny crystals to imitate twinkling stars.
I believe you see all the possibilities - wrapping with seed beads or natural beads on wire or swirls with non-woven wires. Or adding one more bigger bead as in this previous design below.


It is so cool to see your process and how you keep the marble in place despite it not having a hole. How do you maintain the tension?
ОтговорИзтриванеNow that you asked, Divya, I realized I do some things by instinct but it will be good to put them in words :) First of all, the openings in the bottom and on top are small and the marble can't just fall out. The woven strips of wire are hard enough and stay in place when tightly attached to the frame or wrapped around any other woven strips. That said, if extreme force with or without an instrument is applied, the pendant might be ruined, it's nothing like metalsmithing.
ОтговорИзтриване